
How to set up this blog with Jekyll and GitHub pages
·Outline
- Installation and setup
- Quick setup
- Minimal viable website
- Starting jekyll server
- Adding first content
- Updating preferences
- Updating (S)CSS
- Adding socials to the footer
- Adding a feature image
On GitHub Pages you can host websites like this one for free. There are tons of tutorials out there, here I’m just sharing how I set up this very blog you’re reading.
By default GitHub Pages uses Jekyll for building your website but they will also accept already built static files or your own workflow for building your website.
In this post I am using Jekyll and the template alembic. I will show how and what I modified to make my site.
Installation and setup
We will be using Jekyll and bundler so we can locally preview the website while working on it.
To install Jekyll we’ll first install ruby. On Linux or Windows Subsystem for Linux (WSL) we install like this:
sudo apt install ruby-full build-essential zlib1g-dev
On a mac we do:
brew install ruby
Next we install bundler which we will use to manage the ruby plugins.
gem install bundler
We’ll make our project directory and call it my_jekyll_website
mkdir my_jekyll_website
cd my_jekyll_website
To setup our project we record our dependencies in the Gemfile.
Gemfile
source 'https://rubygems.org'
gem "github-pages", group: :jekyll_plugins
gem "jekyll-remote-theme"
We are using the github-pages plugin so we can test locally.
The jekyll-remote-theme plugin lets us use themes other than those preconfigured for GitHub Pages. We will show in the section adding first content how to use a remote theme.
Next we’ll add jekyll to the Gemfile like so:
bundle add jekyll
This will pin a specific version of jekyll, in my case 3.10.
Now we install all the dependencies
bundle install
Quick Setup
The remainder of this post is about setting up elements piece by piece, explaining what they do and how to modify them. If you want to just get started right now and change things later, you can download the GitHub Pages with remote theme kit linked to on the theme’s GitHub. This kit uses reasonable defaults and enables most features from the get-go. You can still always come back to my post and read about how to further modify the theme for your needs.
Minimal viable website
Starting jekyll server
If we want jekyll to start serving a webpage from our directory, we run the following command.
bundle exec jekyll serve --watch
This will keep jekyll running and refreshing as we make changes. The initial output should show us something like this:
To use retry middleware with Faraday v2.0+, install `faraday-retry` gem
            Source: /home/myuser/my_jekyll_website
       Destination: /home/myuser/my_jekyll_website/_site
 Incremental build: disabled. Enable with --incremental
      Generating...
                    done in 1.573 seconds.
 Auto-regeneration: enabled for '/home/myuser/my_jekyll_website'
    Server address: http://127.0.0.1:4000
  Server running... press ctrl-c to stop.
This also creates a directory called _site which jekyll has populated with an assets folder:
ls -la _site
total 12
drwxrwxr-x 3 tobsecret tobsecret 4096 Feb  5 22:33 .
drwxrwxr-x 3 tobsecret tobsecret 4096 Feb  5 22:33 ..
drwxrwxr-x 3 tobsecret tobsecret 4096 Feb  5 22:33 assets
If we now go to http://127.0.0.1:4000 we see jekyll is serving up the file structure of our _site directory:

This _site directory can have a lot of files in it, so we’d like to not have those show up when we use git for version control, so we’ll make a .gitignore file to ignore this and a few other artefacts that Jekyll can create:
.gitignore
_site
.jekyll-cache
.sass-cache
Adding first content
I am using a Jekyll template called Alembic for my blog which comes with a nice default setup.
In our _config.yml we’ll tell Jekyll to use the jekyll-remote-theme plugin and specify the remote_theme: daviddarnes/alembic@main. In the navigation_header section we’ll specify two sections: Home and Blog. For our webpage this will generate a Home and a Blog link at the top of every page in the navigation header.
_config.yml
title: Tobsecret's homepage
description: Programming Blog & Dominion sets
plugins:
  - jekyll-remote-theme
remote_theme: daviddarnes/alembic@main

# 9. Site navigation
navigation_header:
- title: Home
  url: /
- title: Blog
  url: /blog/
The paths in the navigation_header section specify the path in our directory where jekyll should be looking for a file called index.md that has the content for the page.
So for our Home page it will look in /, so directly in our project directory.
index.md
---
layout: page
title: Home
---


---

Latest blog posts:
{% for post in site.posts limit:5 %}
- [{{ post.title }}]({{ post.url }}) — {{ post.date | date: "%Y-%m-%d" }}
{% endfor %}
layout: page is important since Alembic predefines the layouts for page and post, i.e. those pages will get the navigation header and other features of Alembic.
The little loop in the index.md grabs the latest 5 posts from the _posts folder by their date field.
If we refresh our page, it should now look like this:
 Notice the header now has two links, one to
 Home and one to Blog.
If we clicked on Blog we would get a 404: File Not Found.
To populate that page we’d have to make another page blog/index.md which I’d just copy what the template uses:
---
layout: page
title: Blog
permalink: /blog/
---


{% if site.posts.size == 0 %}
No posts yet. Create posts in the `_posts` folder.
{% else %}
<ul>
{% for post in site.posts %}
  <li><a href="{{ post.url }}">{{ post.title }}</a> — {{ post.date | date: "%Y-%m-%d" }}</li>
{% endfor %}
</ul>
{% endif %}
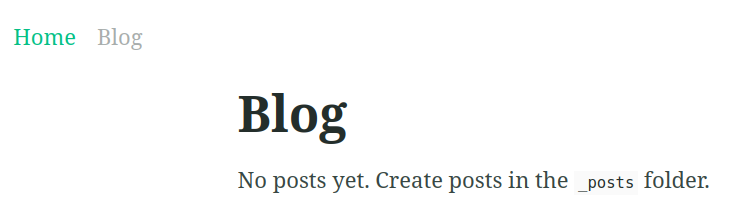
Now if we wanted to add our first post, so something actually shows up in the blog, we want to create a file _posts/2026-02-15-first-post.md:
---
layout: post
title: "Writing helps me think"
date: 2026-02-15 12:00:00 +0000
---
When I write about the software I write, I find myself looking up
a lot more questions than when I am just getting things done.
And now our blog page is updated:

You can similarly also copy the Search section by adding a section in the navigation_header section of your _config.yml:
navigation_header:
- title: Home
  url: /
...
- title: Search
  url: /search/
and copying over the search/index.md:
---
title: Search
excerpt: "Search for a page or post you're looking for"
---

{% include site-search.html %}
Updating preferences
Updating (S)CSS
Usually to update files that the template has pre-defined, we have to provide an alternative copy of that file.
To update the site’s styling via SCSS everything goes through assets/styles.scss which looks like this in the template default:
---
title: false
styles: true
---
@import "alembic";
When Jekyll processes this Sass (.scss), @import "alembic" generates all of the style elements included with the template. This means if we want to change any of those, we have to import or explicitly call them before alembic is imported.
Let’s change the colors via a file _sass/modified_colors.scss. Putting it in the _sass folder means Jekyll will find it when we try to import it.
_sass/modified_colors.scss.
$linkColour: #61AFFF; // Modulex Medium Blue
$hoverColour: #0055BF; // Blue
$accentColour: #61AFFF; // Modulex Medium Blue
We also have to modify assets/styles.scss to import the colors before alembic gets imported:
assets/styles.scss
---
title: false
styles: true
---
@import "modified_colors";
@import "alembic";
Any additional SCSS can be imported below alembic, e.g. for my dominion section I wrote _dominion.scss to standardize the formatting of the dominion cards and the containers for the expansions.
Adding an RSS feed
RSS feeds can be used to automatically get updated when a new post is published via an RSS reader like Feedly.
In Jekyll we only have to add this little line to our _config.yml
plugins:
  ...
  - jekyll-feed
Now our RSS feed is automatically generated and available at <domain>/feed.xml (i.e. tobsecret.github.io/feed.xml).
Adding socials to the footer
By default the template sets up the footer to contain the same navigation as the header, or optionally a clickable link with some text. The template also features a way to include social links and having them displayed in an aside. For my blog I wanted these socials to instead show in the footer.
First let’s set up our socials in _config.yml as defined by the template:
social_links:
  LinkedIn: https://www.linkedin.com/in/tschraink
  GitHub: https://github.com/tobsecret
  RSS: /feed.xml
All we need to do is to create _includes/nav-footer.html with this content:
{% if site.navigation_footer %}
<nav class="nav  nav--footer">
  <ul class="list list--nav">
{% include nav-social.html %}
  </ul>
</nav>
{% else %}
  {% include nav-default.html %}
{% endif %}
The template provides its own _includes/nav-footer.html which instead of just {% include nav-social.html %} includes some logic for handling the text + external link the template would use.
We also have to enable this footer in the _config.yml like so:
navigation_footer: true
And we can now see the socials in our footer:

Adding a feature image
I spent some time to model and render my banner image in Blender and wanted to add it to each post. My banner is assets/banner.webp.
We can add this for all posts by adding the following to our _config.yml:
# 5. Collections
defaults:
  -
    scope:
      path: ""
      type: "posts"
    values:
      layout: post # Set the default layout for posts
      feature_image: "/assets/banner.webp"
  -
    scope:
      path: ""
      type: "pages"
    values:
      layout: page # Set the default layout for pages
      feature_image: "/assets/banner.webp"
This won’t update immediately in your browser so you’ll have to interrupt your bundle exec jekyll serve --watch call with CTRL+C and then restart it. Refresh the page and you should see the banner at the top.
You can still manually override it in any particular page or post by specifying a feature_image in the markdown:
---
layout: page
title: Blog
permalink: /blog/
feature_image: /assets/some_other_banner.png
---